Install the Passive Identity Agent Software
This task discusses how to install the passive identity agent software. For a simple installation, you can install it on your Microsoft Active Directory (AD) domain controller; for other options, see Deploy the passive identity agent.
Note | We recommend you use the latest version of the passive identity agent. To see the available versions, go to software.cisco.com. To upgrade the passive identity agent, see Upgrade the passive identity agent software |
Procedure
Step 1 | Download the passive identity agent from software.cisco.com. | ||||||||
Step 2 | Log in as a member of the Administrators group to the machine on which to install the passive identity agent. | ||||||||
Step 3 | Double-click CiscoPassiveIdentityAgentInstaller-1.1.1.msi . | ||||||||
Step 4 | Click Next. | ||||||||
Step 5 | Choose a folder in which to install the passive identity agent and click Next. The default installation folder is Program Files\Program Files (x86)\Cisco\Cisco Passive Identity Agent . | ||||||||
Step 6 | Click Next. | ||||||||
Step 7 | Click Install. | ||||||||
Step 8 | When the installation is done, click Finish and optionally check the box to start the passive identity agent. | ||||||||
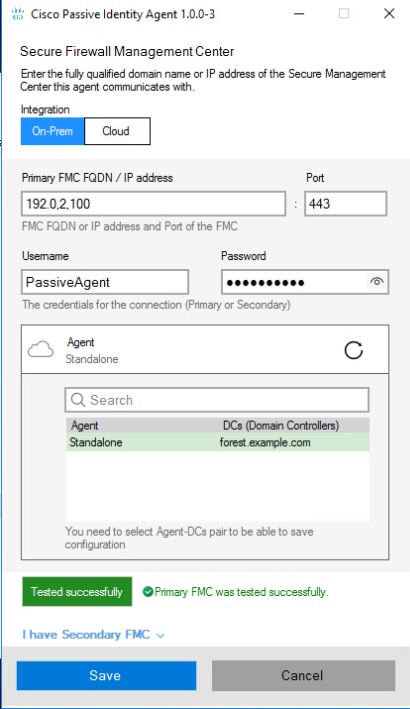
Step 9 | When the passive identity agent starts, click the On-Prem tab if you are using the agent with an on-premises Cloud-Delivered Firewall Management Center (physical or virtual) or click the Cloud tab if you are using the agent with Cloud-Delivered Firewall Management Center. | ||||||||
Step 10 | In the Cisco Passive Agent dialog box, enter the following information:
| ||||||||
Step 11 | Click the Agent list. | ||||||||
Step 12 | From the list, click the name of the domain controller to monitor. | ||||||||
Step 13 | Click Test. The following figure shows an example.
| ||||||||
Step 14 | Only if the test succeeds, click Save. |