Troubleshoot Management Connectivity on a Data Interface in a High Availability Pair
This topic helps you troubleshoot the loss of management connectivity on a data interface in High Availability.
Model Support—Threat Defense
The management connection between the active peer and the Security Cloud Control can be disrupted due to the following reasons:
-
Data interface used for management on the Active unit has connectivity issues.
You should manually fail over to the standby unit and then configure a new data interface for Security Cloud Control access.
-
Internet Service Provider has changed.
You should manually update the new network details on the active unit using the CLI commands to restore the device connectivity with Security Cloud Control .
Data Management Interface on Active unit has Connectivity Issues
-
In Security Cloud Control, manually switch the active unit to standby. See Switch the Active Peer in the Firewall Threat Defense High Availability Pair.
Alternatively, you can run the no failover active command on the active unit.
The standby device becomes the new active device in the high availability pair and establishes communication with Security Cloud Control.
-
Next to the device high-availability pair you want to edit, click Edit (
 ).
). -
Choose and delete the static route defined for the old data management interface.
-
Click the Interfaces tab, and make the following changes.
-
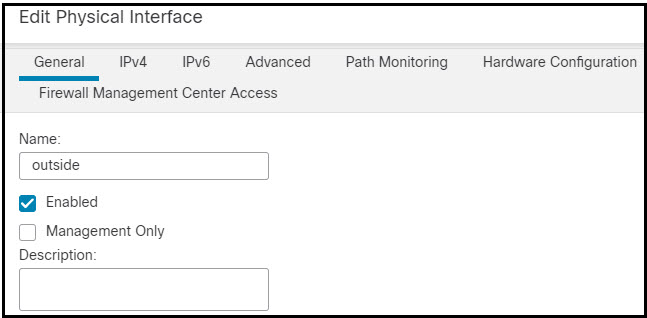
Remove the IP address and name from the old data management interface, and disable Security Cloud Control Access for this interface.
NoteBefore removing the old data management interface information, remember the details if you want to use the same information.
Click the Edit (
 ) next to the interface you want to remove.
-
Clear the content in the Name field.
-
Uncheck the Enabled checkbox.
-
In the IPv4 or IPv6 tab, remove the active address.
-
In the Firewall Management Center Access tab, uncheck Enable management on this interface for the Firepower Management Center.
-
Click OK.
-
Click Yes to confirm the changes.
-
Configure the new data management interface with the settings of the old interface (the ones you used at the CLI), and enable Security Cloud Control Access for it.
-
Click Edit (
 ) next to the data interface you want for handling management traffic.
 -
In the Name field, specify a name for the interface.
-
Check the Enabled checkbox.
-
In the IPv4 or IPv6 tab, specify the active address.
-
In the Firewall Management Center Access tab, check Enable management on this interface for the Firepower Management Center.
-
Click OK.
-
Click Yes to confirm the changes.
-
-
-
Click the High Availability tab, and make the following changes.
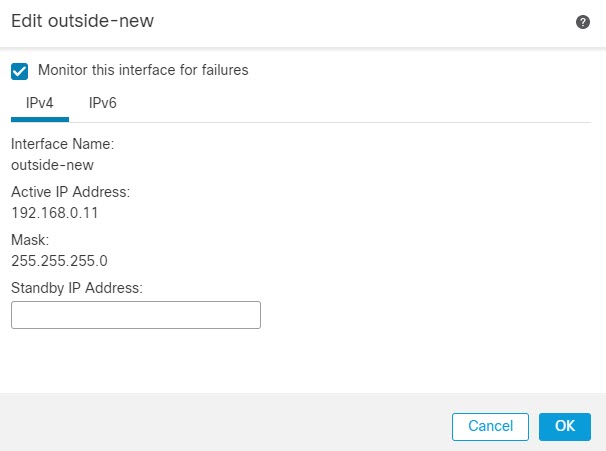
In the Monitored Interfaces area, click the Edit (
 ) next to the new data management interface.
The Active IP Address shows the active device's IP address.
On the IPv4 tab, enter the Standby IP Address and Gateway address.

-
If you configured the IPv6 address manually, on the IPv6 tab, click Edit (
 ) next to the active IP address, enter the Standby IP Address, and click OK.
 -
Click OK.
-
Click Save at the top-right corner to save the changes.
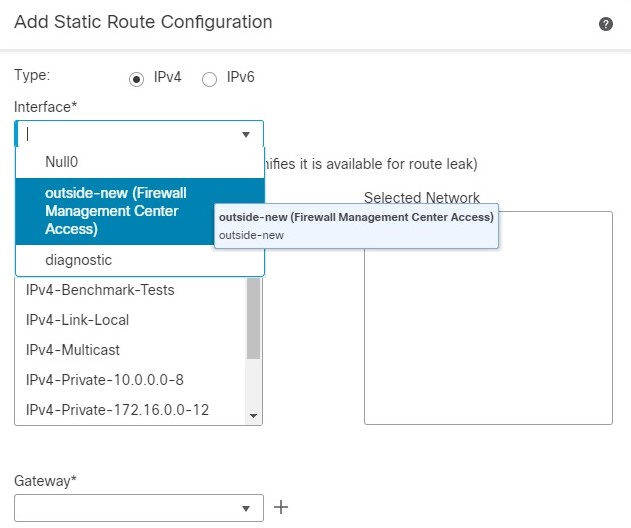
Choose and add the static route defined for the new data management interface. The new data interface appears in the Interface list.

-
Click Save at the top-right corner to save the changes.
-
Deploy configuration changes..
-
When the deployment completes around 90 percent, the new management interface takes effect. At this stage, you must re-cable the FTD so that the Security Cloud Control reaches FTD on the new interface and completes the deployment successfully.
NoteAfter you re-cable, the deployment may fail if it timed out before re-establishing the management connection to the new interface. In that case, you must reinitiate the deployment after re-cabling for a successful deployment.
-
Ensure the management connection is reestablished.
In Firewall Management Center, check the management connection status on the page.
Alternatively, at the FTD CLI, enter the sftunnel-status-brief command to view the management connection status.
Internet Service Provider has Changed
If you have changed your ISP, you can lose management connectivity, even though High Availability health is normal. Configure the new network details of the management interface using the CLI commands.
Note | These commands are available only on the active unit and not on standby. |
For information about the Firewall Threat Defense CLI, see the FTD command reference.
-
Connect to the device CLI.
You should use the console port when using these commands. If you are editing the configuration due to a disrupted management connection, and you have SSH access to the dedicated Management interface, then you can use that SSH connection.
-
Log in with the Admin username and password.
-
Use one of the following commands depending on the network value you want to update:
-
configure network management-data-interface ipv4 manual ip_address ip_netmask interface interface_id
-
configure network management-data-interface ipv4 gateway_ip interface interface_id
-
configure network management-data-interface ipv4 manual ip_address ipv4_netmask gateway_ip interface interface_id
Example:
Configure network management-data-interface ipv4 manual 10.10.6.7 255.255.255.0 interface gig0/0 Configuration updated successfully..!!NoteAll other CLI commands of configure network management-data-interface are not supported on devices in a High Availability pair.
The configuration is automatically pushed to the standby device.
-
-
Optional:Limit data interface access to Security Cloud Control on a specific network.
configure network management-data-interface client ip_address netmask
By default, all networks are allowed.
-
Check that the management connection was reestablished.
sftunnel-status-brief
See the following sample output for a connection that is up, with peer channel and heartbeat information shown:
> sftunnel-status-brief PEER:10.10.17.202 Peer channel Channel-A is valid type (CONTROL), using 'eth0', connected to '10.10.17.202' via '10.10.17.222' Peer channel Channel-B is valid type (EVENT), using 'eth0', connected to '10.10.17.202' via '10.10.17.222' Registration: Completed. IPv4 Connection to peer '10.10.17.202' Start Time: Wed Jun 10 14:27:12 2020 UTC Heartbeat Send Time: Mon Jun 15 09:02:08 2020 UTC Heartbeat Received Time: Mon Jun 15 09:02:16 2020 UTC -
In Security Cloud Control, click Security Devices > FTD.
-
Select your Firewall Threat Defense and in the Management pane on the right, click Device Summary.
-
In , click Refresh.
The Security Cloud Control detects the interface and default route configuration changes, and blocks deployment to the FTD. When you change the data interface settings locally on the device, you must reconcile those changes in Security Cloud Control manually. You can view the discrepancies between Security Cloud Control and the Firewall Threat Defense on the Configuration tab.
-
Return to the FMC Access Details dialog box, and click Acknowledge to remove the deployment block.
The next time you deploy, the Security Cloud Control configuration will overwrite any remaining conflicting settings on the FTD. It is your responsibility to manually fix the configuration in the Security Cloud Control before you re-deploy.
You will see expected messages of "Config was cleared” and “FMC Access changed and acknowledged.”
The configuration change made on the active unit is automatically pushed to standby. Once the Security Cloud Control restores its connectivity with the active unit, Security Cloud Control updates the standby IP address.